» Marketing and Communication » Web Services » Help
After deciding what content and pages need included, a site map can be laid out to help establish navigation and organization of pages.
Download our example website outline template ![]() to get started establishing the new or revised site map. You'll find an example with some recommendations in this document.
to get started establishing the new or revised site map. You'll find an example with some recommendations in this document.
Provide the basics of what information needs to be displayed on a certain page. Then, decide what template to use to properly display that information. For examples of different templates to use, view the Templates and Layouts page.
After identifying what pages you need and outlining the content on them, basic wireframes can created. A wireframe is a 'mockup' of an individual webpage or elements of a webpage. The webteam will reference these when building pages.
Not all pages require a wireframe. Many times only homepages and main landing pages have a need to go through the planning stage of creating a wireframe. Interior or consent pages often work with a simple layout that this step would be unnecessary to do.
These can be a basic drawing of a page(s) and the layout/order of content on it. Wireframing can be done with screenshots with notes or they can even be drawn on white board or pencil to paper.
Wire framing tools
Faculty and staff members school/department that wish to update their individual webpage can use this person page content template ![]() . Please, share this document with new or returning faculty and staff. When completed these can be returned to webteam@nwmissouri.edu.
. Please, share this document with new or returning faculty and staff. When completed these can be returned to webteam@nwmissouri.edu.
Note on Headshots:
- New faculty have an opportunity for headshots within the orientation time. A time will be set with Multimedia services during their first day on campus.
- All others, headshots are available on the first working Monday of each month in the studio (3rd floor, Ownes Library). Visit the headshot appointment scheduler to select your time for a new or refreshed headshot.
If a program, major or minor, page needs updated we have a content guide to help collect information our team can use to build a refreshed and relevant webpage for the program.
You can use this program page content template ![]() . Fill this out to the best of your ability and focus on connecting ideas for our team to finalize and fill in the pieces. Then, share this document with webteam@nwmissouri.edu.
. Fill this out to the best of your ability and focus on connecting ideas for our team to finalize and fill in the pieces. Then, share this document with webteam@nwmissouri.edu.
Self Service Photos: To find photos for the web, access high-quality, downloadable photos or a logo for a self-designed content.
Use caution with photos from miscellaneous web sources as the University may not have rights to use the photos. Look for open licensed files or use a stock service like Adobe Stock to ensure photos are from legal sources.
TIP: Be sure your photos are in RGB mode, not CMYK
TIP: In general, use WEBP or JPG files on the web.
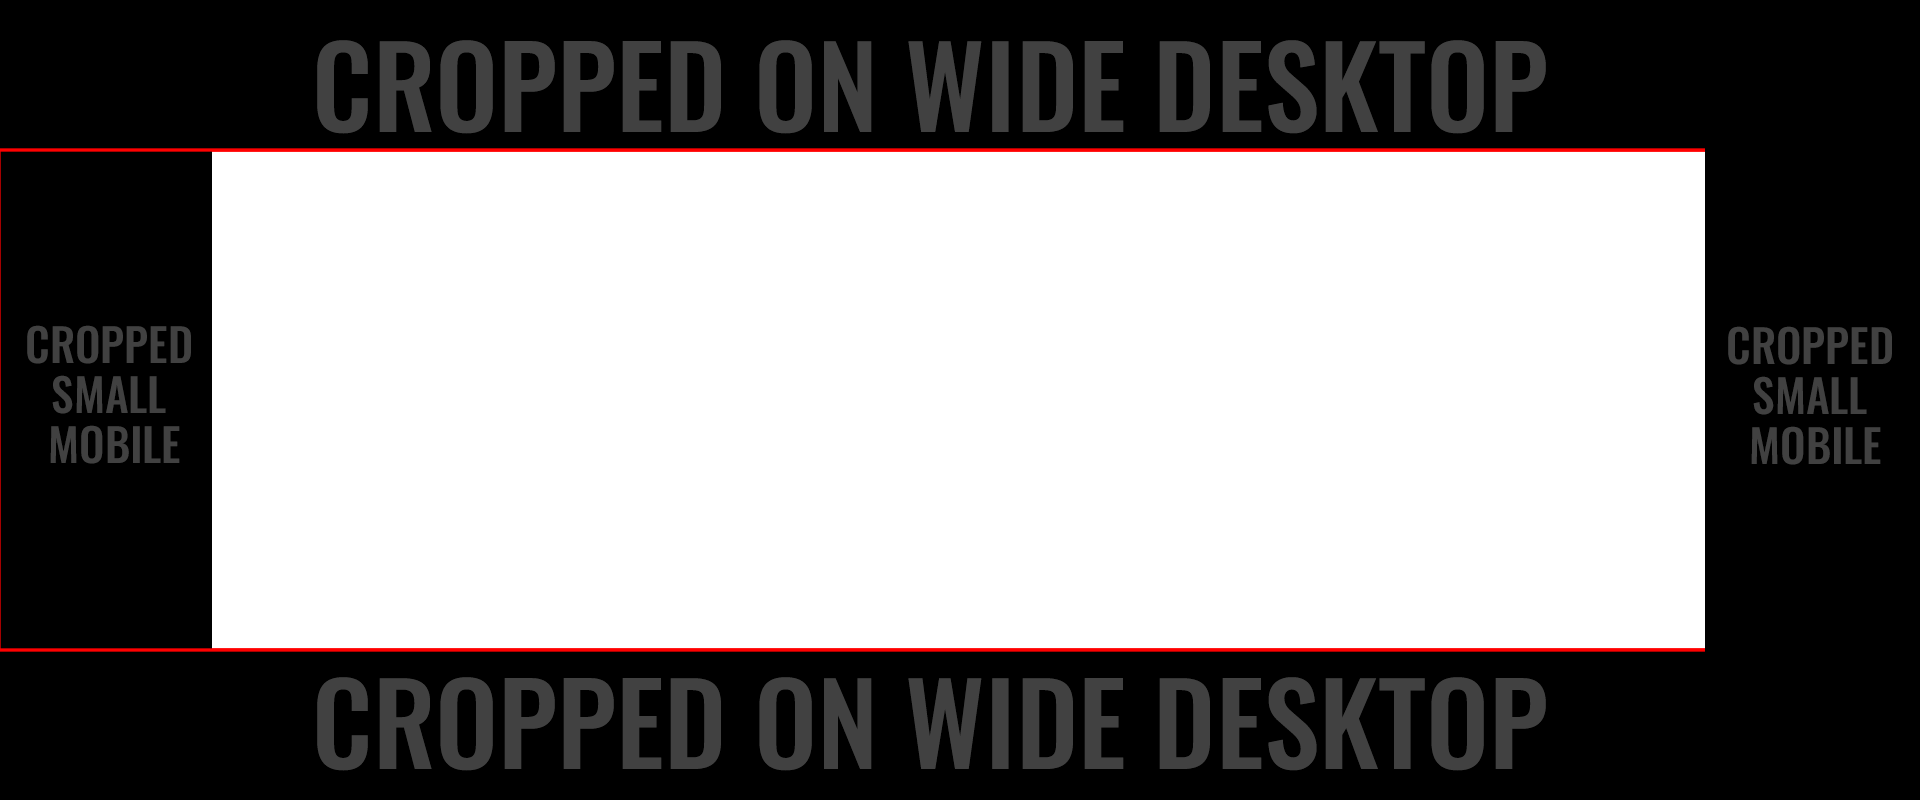
Here is a template to help make header images that look nice on all devices. Note the cropping that occurs on different screen sizes.
To use:
Instructions to crop header images in Cascade can be found here:
Here is a template to create the circle photo in the Photo quote panel.
To use:

Adobe Reader is free to download. But to make edits, a software like Adobe Acrobat Pro is required and has a cost to use. If you do not have the software needed, many lab computers on campus have enterprise licenses to Adobe and include Acrobat Pro. Or, you can request edits from the web or design teams in the Marketing office.
Comments on PDFs are very helpful to request edits. More info on PDF markup and comments from Adobe.
Adobe Acrobat Pro is required and has a cost to use. If you do not have the software needed, many lab computers on campus have enterprise licenses to Adobe and include Acrobat Pro. Or, you can request a fillable PDF from the web or design teams in the Marketing office.
To create a fillable form in Adobe Acrobat: (see original create a pdf form help guide from Adobe for more in depth instruction)
More on PDF Forms from Adobe.